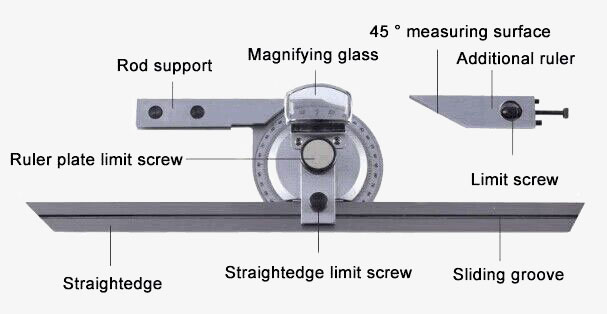
A universal vernier bevel protractor made of high quality stainless steel with a measuring range of 0-360°. The detachable design allows the universal vernier bevel protractor to be mounted on a height gauge for angular measurement of machine fixtures.

Laser engraving provides clear readings
- Universal stainless steel protractors are available for measuring a wide range of angles, including acute, obtuse, and reflected angles.
- Vernier bevel protractor is designed to measure angles with a high degree of precision.
- The vernier bevel protractor is relatively easy to use, with a simple design that allows for quick and accurate measurements.
- The universal stainless steel vernier bevel protractor is clearly marked and resistant to wear and tear for a longer service life.
- The vernier bevel protractor is available in four different combinations for measuring 0-50°, 50° -140°, 140°-230° and 230° -320°.
Application
Universal vernier bevel protractors are widely used in various fields such as construction, engineering, carpentry, metalworking, and woodworking. These tools are commonly used to measure and mark angles accurately, and they are essential for tasks such as cutting, welding, drilling, and machining.

- Model: SISCO-SSP-VBP360
- Range: 0-360°
- Body Process: Surface chrome plating
- Scale Process: Laser scale
- Material: Stainless steel
- Reading Mode: Cursor reading
- Packing: Plastic box packing
Details

Q1: What is a vernier bevel protractor and how does it work?
A1: A Vernier Bevel Protractor is a measuring tool used to measure angles with a high degree of accuracy. It consists of a base, a blade or arm, and a Vernier scale. The blade or arm can be rotated and locked to measure the angle between two surfaces. The Vernier scale provides a more precise reading of the angle, typically down to 5 or 10 arc seconds.
Q2: How to use a vernier bevel protractor to measure an angle?
A2: To measure an angle with a Vernier Bevel Protractor, place the base on one surface and the blade on the other surface. Adjust the blade so that it is parallel to the surface being measured. Lock the blade in place and read the angle from the Vernier scale. Be sure to take into account any error caused by the misalignment of the protractor with the surface being measured.
Q3: How to maintain my vernier bevel protractor?
A3: To maintain the accuracy and longevity of your Vernier Bevel Protractor, keep it clean and free from debris. Store it in a dry location, preferably in a protective case. Periodically inspect the protractor for signs of wear or damage, and replace any damaged parts immediately. Calibrate the protractor regularly to ensure it remains accurate. If you are unsure how to calibrate the protractor, consult the manufacturer's instructions or seek the advice of a qualified professional.
Tips: How to calibrate vernier bevel protractor?
Calibrating a Vernier Bevel Protractor involves two main steps:
Step 1: Zero-Point Calibration
The first step is to ensure that the Vernier Bevel Protractor reads 0 degrees when the blades are fully closed and in contact with each other. To achieve this, follow the steps below:
- Close the blades of the Vernier Bevel Protractor and make sure they are in contact with each other.
- Loosen the locking screw that secures the blades and make sure the protractor can move freely.
- Rotate the protractor base until the zero-degree mark on the Vernier scale is aligned with the reference mark on the base.
- Tighten the locking screw to secure the blades and the protractor in place.
- Check that the protractor reads 0 degrees when the blades are in contact with each other.
Step 2: Verification Calibration
The second step is to verify the accuracy of the Vernier Bevel Protractor at various angles. To do this, follow the steps below:
- Select a standard angle gauge with a known angle.
- Place the angle gauge on a flat surface.
- Place the base of the Vernier Bevel Protractor against the angle gauge, making sure that the blades are in contact with the gauge.
- Read the angle on the Vernier scale and record it.
- Repeat this process with several other angle gauges at different angles to verify the accuracy of the protractor.
- If the readings are not accurate, adjust the protractor by loosening the locking screw and rotating the Vernier scale until it reads the correct angle. Tighten the locking screw once the correct angle has been set.
By following these steps, you can calibrate your Vernier Bevel Protractor to ensure accurate readings.
Thank you for buying industrial test and measurement equipment on SISCO.com, all products sold by SISCO and the partner cover a 12 months warranty, effective from the date of receiving the products.
What is covered?
SISCO is responsible for providing free spare parts, and free technical support to assist the customer to repair the defective products until the problem is solved.
What is not covered?
- Product purchased from anyone other than a SISCO store or a SISCO authorized reseller.
- Expendable parts.
- Routine cleaning or normal cosmetic and mechanical wear.
- Damage from misuse, abuse or neglect.
- Damage from use of parts other than SISCO approved.
- Damage from use outside the product’s usage or storage parameters.
- Damage from use of parts not sold by SISCO.
- Damage from modification or incorporation into other products.
- Damage from repair or replacement of warranted parts by a service provider other than a SISCO authorized service provider.
- Damage caused by the application environment not meeting the product usage requirements and the failure to perform preventive maintenance.

