A digital multimeter is a versatile electronic measuring device, which can measure voltage (volts), current (amperes), and resistance (ohms). It is widely used in electrical and electronic work, also favored by the majority of users due to their versatility and portability. A typical digital multimeter can measure voltage (both AC and DC), current (both AC and DC), and resistance. It can also perform other functions such as continuity testing, diode testing, capacitance measurement, and frequency measurement. Digital multimeters display readings in numeric form on a digital screen, providing precise and accurate measurements. Do you want to know how to use a digital multimeter tester properly? SISCO will give you some steps and cautions to put your magic tool to good use.
Preparation
- Check your digital multimeter: Make sure the battery is sufficiently charged and check whether the probe is intact;
- Understand the function of your digital multimeter: Read the symbols and readings on the screen, and familiarize yourself with the various gears and functions.
Specific steps
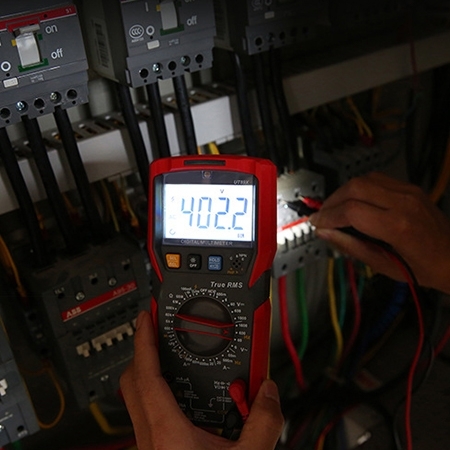
Voltage measurement procedure: DC voltage measurement (DCV) and AC voltage measurement (ACV)
- Select the range: Rotate the range knob of the multimeter tester to the appropriate voltage measurement gear (V or mV). If you are unsure of the voltage, select the highest range first to avoid damaging the multimeter.
- Connect the probes:
- Plug the red probe into the voltage input of the multimeter (usually labeled "V" or "VΩ").
- Plug the black probe into the common terminal of the multimeter (usually labeled "COM"). - Measure the voltage:
Direct Current (DC):
- Set the digital multimeter tester to DC voltage measurement mode (usually labeled "V" followed by a straight line and a dotted symbol).
- Touch the red probe to the positive or high potential point in the circuit and the black probe to the negative or low potential point.
Alternating Current (AC) Voltage:
- Set the multimeter tester to AC voltage measurement mode (usually labeled with a "V" followed by a wavy line symbol).
- Touch the red and black probes to the two measurement points in the circuit. - Note the reading: The measurement result will be shown on the multimeter display. Note whether the units are in volts (V) or millivolts (mV) and record the reading as required.
- End the measurement: Remove the probe, turn off the multimeter, and store them away.
Current measurement procedure:
- Select the range: Select the appropriate current range according to the expected current magnitude. If you are not sure, select the largest range first.
- Disconnect the circuit: When measuring current, the multimeter should be connected in series in the circuit, so it is necessary to temporarily disconnect the circuit.
- Insert the probes:
- Insert the black probe into the "COM" connector.
- Insert the red probe into the "A" or "mA" port, depending on the current you expect to measure. If the expected current is large (more than several hundred milliamps), use the "A" interface; if the expected current is small, use the "mA" interface. - Set the range: Turn the multimeter dial to DC current (DCA) and select the appropriate range. In general, the default selection of the larger range, and then gradually reduce.
- Series circuit: Connect the two ends of the disconnected circuit to the two probes of the digital multimeter tester, so that the tester is connected in series with the load. The specific operation is to disconnect the part of the circuit that needs to measure the current and insert the probes into the circuit to complete the connection of the disconnected part.
- Note the reading:
- Turn on the power and observe the current reading displayed by the multimeter. If "OL" or "-1" is displayed, it means that the current range is too small and you need to select a larger range.
- Record the reading and note whether the unit is Ampere (A) or milliampere (mA).
Resistance measurement procedure:
- Adjust the mode: change the mode of a multimeter to the resistance measurement mode, usually marked as "Ω" or having a resistance symbol.
- Insert the probes:
- Insert the black probe into the "COM" port of the multimeter.
- Plug the red probe into the "Ω" port of the multimeter. - Select the range:
- If the multimeter has the function of auto-range, it will select the appropriate range automatically.
- If there is no auto-range function, manually select a suitable range for the expected resistance value range. - Test the resistance:
- Touch the red and black probes to both ends of the resistor.
- Ensure that there is good contact between the probes and the resistor, and avoid direct finger contact with the test point to avoid affecting the reading. - Note the reading: The digital multimeter display will show the resistance value. Read the resistance value according to the displayed value, if it shows "OL" or "1", it means that it is out of the current range, you need to choose a larger range.
Advanced Functions
- Diode test: Select diode test gear, connect the probe to both ends of the diode and read the voltage drop.
- Capacitance measurement: Select capacitance measurement gear, connect the probe to both ends of the capacitor, read the capacitance value.
- Frequency measurement: Select the frequency measurement gear, connect the probe to the signal source, read the frequency value.
Safety Precautions
- Safety check before use: Make sure the multimeter is not visibly damaged.
- Precautions for measuring high voltage chamber: Keep hands dry and use insulated gloves.
- Avoid incorrect connection: Make sure the stops are correct and the probes are connected correctly.
Common problems
- Unstable reading:
- Check whether the contact of the probe is good;
- Check the battery power. - No respond of screen:
- Check whether the battery needs to be replaced;
- Check whether the fuse is damaged. - Inaccurate measurement:
- Ensure correct gear selection;
- Calibrate the multimeter.